(626) 966-4770 841 E. Route 66 Glendora, CA 91740 info@tassigns.com
(626) 966-4770 841 E. Route 66 Glendora, CA 91740 info@tassigns.com
General Projects: 1-2 Business Days.
Complex Projects: Up 5 Business Days or More.
For an accurate estimate, TAS will need all the specifications of your project. For simple projects we can provide estimates same day or next day via email. On specific occasions we are able to provide you an immediate verbal estimate. Verbal estimates are not guaranteed. We will then follow that up with a documented estimate via email, text or hard copy. Please ensure you have a documented estimate before moving forward.
General Projects: 1-5 Business Days, after cost approval and required deposit.
Complex Projects: Up to 10 Business Days or More, after cost approval and required deposit.
With all information, clear instructions, accepted art files art_guidelines TAS generally can create initial proofs accurately and quickly.
General Projects: Same Day to 5 Business Days.
Complex Projects: Up to 10 Business Days or More.
It advisable to provide all the revisions at once to avoid delays in the total project timeline. TAS understands that some revisions are simple, some are complex, some are in-between. We will make every effort to complete your revision as quickly as possible.
Due to the changes of global supply chain and shipping from the COVID 19 pandemic, TAS does not guarantee or warranty any specific production times. Any acknowledgement of due dates will only be considered as a “best scenario,” however, TAS has ALWAYS prided itself on setting accurate expectations and following through with promised deadlines to the best of our ability.
The project will be ready for Will Call or Shipping the day after the last production day.
Standard Screen Printed Items: 10-12 Business Days.
Complex Screen Printed Projects: 10+ Business Days.
Standard Embroidered Items: 10-12 Business Days.
Complex Embroidered Items: 10+ Business Days.
Standard Heat Applied Items: 10-12 Business Days.
Complex Heat Applied Items: 10+ Business Days.
Standard Rhinestone Items: 10-12 Business Days.
Complex Rhinestone Items: 10+ Business Days.
Standard Jackets: 5-6 Weeks.
Specialty Jackets: 6+ Weeks.
Standard Chenille Patches: 12-15 Business Days.
Complex Chenille Patches: 15+ Business Days.
Standard Items: 12-15 Business Days.
Complex Items: 15+ Business Days.
Standard Embroidered Patches: 10-12 Business Days.
Complex Embroidered Items: 12+ Business Days.
Standard Leather Patches: 12-15 Business Days.
Complex Leather Patches: 15+ Business Days.
Standard PVC/TAS FLEX Patches: 15-20 Business Days.
Complex PVC/TAS FLEX Patches: 15+ Business Days.
Standard Real Estate Signs: 3-5 Business Days.
Complex Real Estate Signs: 5+ Business Days.
Standard Storefront Signs: 10-12 Business Days.
Complex Storefront Signs: 12+ Business Days.
Standard Political Signs: 3-5 Business Days.
Complex Political Signs: 5+ Business Days.
Standard Canvas & Photo Prints: 3-5 Business Days.
Complex Canvas & Photo Prints: 5+ Business Days.
Standard A-Frame Signs: 3-5 Business Days.
Complex A-Frame Signs: 5+ Business Days.
Standard Yard Signs: 3-5 Business Days.
Complex Yard Signs: 5+ Business Days.
Standard Banners & Flags: 3-5 Business Days.
Complex Banners & Flags: 5+ Business Days.
Standard Off-Set/Flat Printing: 3-8 Business Days.
Complex Off-Set/Flat Printing: 8+ Business Days.
Standard Decals, Stickers & Labels: 3-12 Business Days.
Complex Decals, Stickers & Labels: 12+ Business Days.
Standard Vechicle Magnets: 3-5 Business Days.
Complex Vechicle Magnets: 10+ Business Days.
Standard Spot Vechicle Graphics : 3-5 Business Days + 1-3 Business Day Installation.
Complex Spot Vechicle Graphics: 5+ Business Days + 1-5 Business Day Installation.
Standard Vechicle Wrap : 6-11 Business Days + 1-3 Business Day Installation.
Complex Vechicle Wrap: 11+ Business Days + 1-5 Business Day Installation.
Standard Promotional Items: 6-21 Business Days.
Specialty Promotional Items: 21+ Business Days.
Standard Promotional Items: 6-21 Business Days.
Specialty Promotional Items: 21+ Business Days.
We recommend saving as an original vector, Adobe Illustrator (.ai,
.eps, .svg ver CS6 or earlier). We can also accept original vector
PDF’s. Alternatively, we can accept JPG, JPED, TIF, TIFF and PNG,
however these will be un-editable so we would expect they will be
ready for print.
If you choose to use our Embroidery process, A digitizing fee
will be added to your shopping cart once you upload a vector file,
our system uses .EMB file extension for our embroidery machine.
We prefer that you send an .ai with all fonts outlined and all images embedded, not linked.
We request all files less than 10 MB to be sent via email attachment. If your files are larger than 10 MB, please send via WeTransfer to info@tassigns.com. WeTranfer allows you to send up to 2 GB for free.
If you send us an RGB file, there is a chance that a color shift may occur and you may not be satisfied with your job.
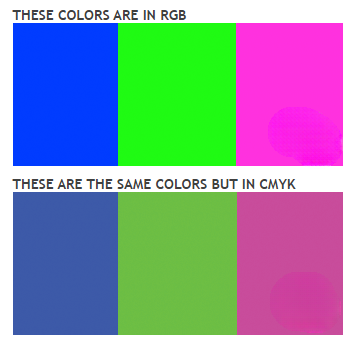
You should always start and finish your designs in CMYK color mode.
Low resolution files may be printed as is or will be placed on hold until we receive new files, slowing your turn-around.

Raster images less than 300 dpi at 100% will result in low quality printing, blurriness and pixilation.
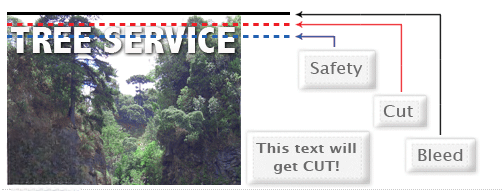
For all Offset/Flat Printing projects, bleeds must extend past the cut-line and will be trimmed from the product during the final cutting phase. When the image is required to extend all the way to the edge, bleed is needed to preserve the finished look and the quality of the final product.
Please keep all text at least 0.125" inside the cut-line.
We recommend using our templates at all times.
Examples of Offset/Flat Printing: Business Cards, Post Cards, Flyers, Brochures.
The Bleed for Standard Products is 0.125”
Example of size: For a 4”x6” Post Card the artboard should be 4.125”x6.125” and the bleed should extend to that dimension. The safety margin for text should be 3.875”x5.875” size.
Yes, but if the border is too close to the cutline, it may be cut off-center slightly.
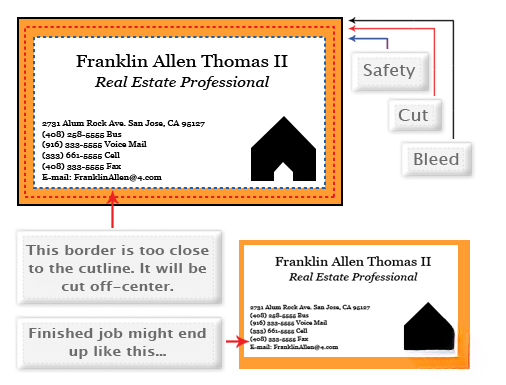
We cut through many sheets at a time, so watch your borders to avoid an unwanted mistake.
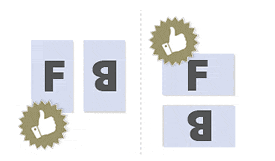
TAS requires Print Ready files with proper rotation. Files submitted are printed HEAD to HEAD as-is based off your files.
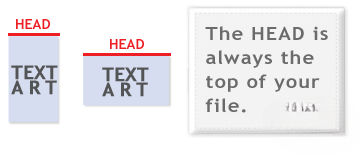
Make sure to set up your files so that when we print them HEAD to HEAD the final product will read the way you would like. Also, front and back files need to be set up either both sides vertically or both sides horizontally.
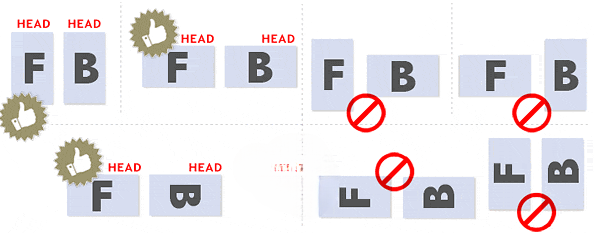
If you would like your back file to be upside down, please send your artwork as shown below.
If you have a fold-over or greeting card, please send your artwork as shown.
For files not properly set up, TAS will use best judgment and will not be responsible for improper rotation.
Any transparency issue can be resolved before saving your file.

To prevent this, never use shadows, glows, or any other transparency (image or otherwise) on top of a spot color. Always convert your spot color to CMYK and flatten before sending.

All of these effects will cause transparency problems.
When sending artwork, do not send extra files, like proofs or samples, because they might get printed. Only send the files you need printed.
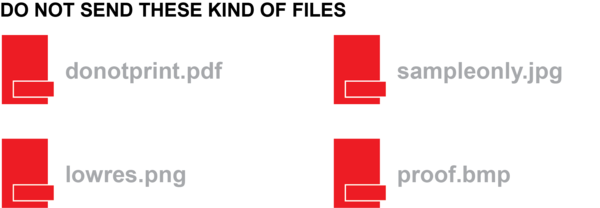
We are not responsible for these kinds of files being printed. Unless requested by one of our employees, DO NOT send files that you do not want printed.
Primarily used to intentionally overlap inks for a number of reasons, overprint can cause unexpected results. We suggest that you turn all overprint objects off before submitting your files.

In this case the logo was set to overprint. The colors from logo are mixing with the colors from the background. Unexpected results may occur if you have accidentally set certain objects to overprint. Always check logos and other artwork before submitting.
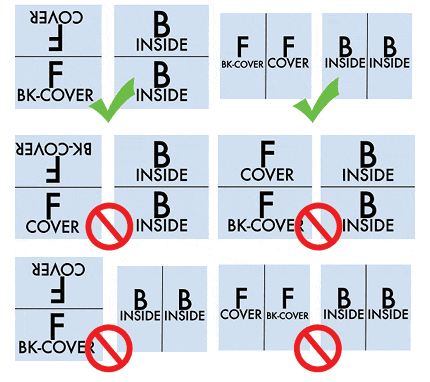
No. We are now specifically set up to process one side at a time, and this requires that each side of a job must be on a separate file.
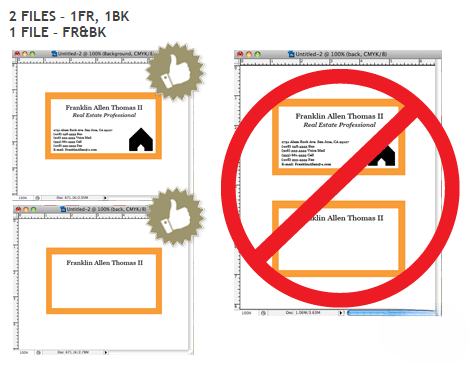
Not separating files will cause delays and you might have to send the files again. Remember to separate the pages of your .pdf files as well.
When creating a Spot UV job, you must include a Spot UV template file along with the regular print file. The Spot UV template file is used to show where the UV coating needs to be applied.
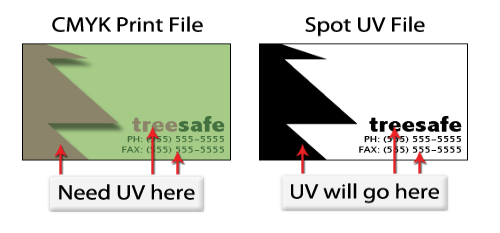
For better quality we recommend creating mask files in vector based programs, preferrable Illustrator.
Please only use solid 100% K to indicate where you would like the UV. Do not use shadows, glows or grayscale images. White will indicate no UV.
Remember, if it's white, you can write!
When using a blue in your design, always make sure to leave at least a 30% difference in your Cyan and Magenta values.
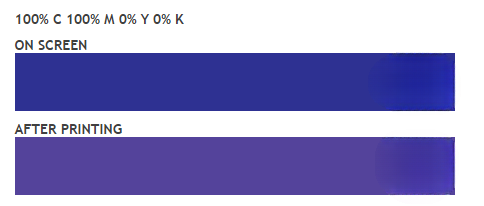
Blue is close to purple in the CMYK spectrum. Remember, use a low amount of magenta whenever using high amounts of cyan to avoid purple.
When exporting from any program such as Indesign or Illustrator, use these settings to make sure your .PDF files export correctly.
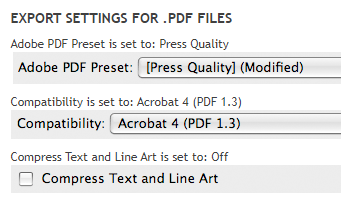
NOTE: Due to Adobe limitations, this preset will not convert all colors into CMYK. You must convert all colors to CMYK before saving your file.
Grayscale images that are converted to CMYK will have a color shift in the final print. That shift may be green or yellow.
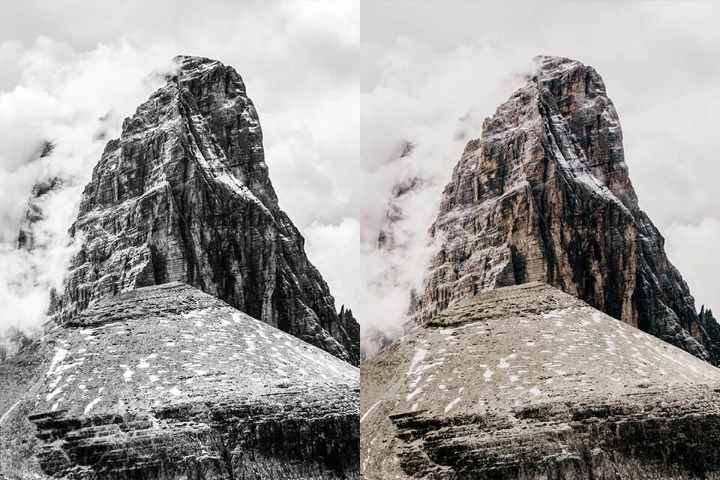
Always check the CMYK values of your grayscale in the final CMYK document. If there are other values other than K in your grayscale image, there is a chance that the color will vary.
To eliminate all values other than K, use your Channel Mixer (adjustment layer) in Photoshop, then click "Monochrome" and adjust accordingly.
Rich black is an ink mixture of solid black, 100% K, with additional CMY ink values. This results in a darker tone than black ink alone. If you print black alone as 100% K, the resulting black may not be as dark as you might like.
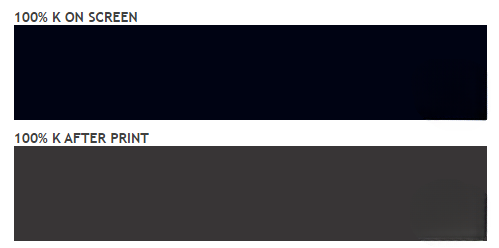
We recommend using
This will give you a deep, dark, rich black.
*Products that are printed with dye-sublimation (9oz Premium Polyester Banner, Flags, Table Covers, Fabric Tube Displays, etc.)
call for the following color values:
Cracking of the edges of a business card sometimes occurs when the card contains high values of ink, as in dark colors.
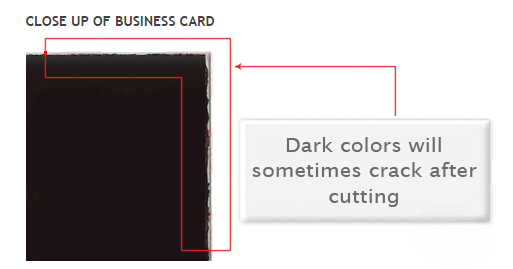
This usually happens on a small amount of cards in the run. To prevent this, use lighter colors or if you must use dark colors, use as little ink as possible.
Many things can cause banding. Banding can be caused by the program that it is exported from, such as InDesign or Corel. Also, too many gradient steps, for example going from a very light color to a dark color, in a small area will cause banding.
CLOSE UP OF BANDING
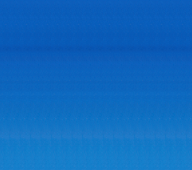
To prevent this, check your digital files before sending. If you use a gradient, make sure it has enough room for a smooth transition.
There are three different ways Pantone colors can affect the way your job prints.
first is by object effects, such as shadows or glows, on top of your Pantone colors. Here is what the effects will look like on screen:
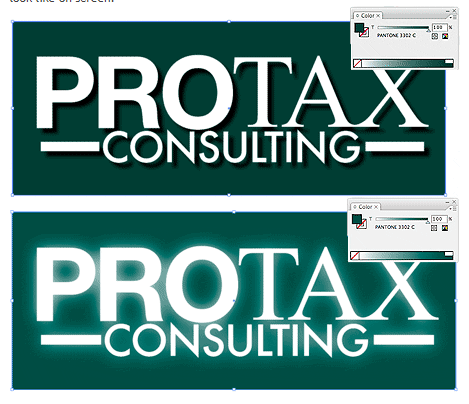
Here is what the effect looks like after printing:
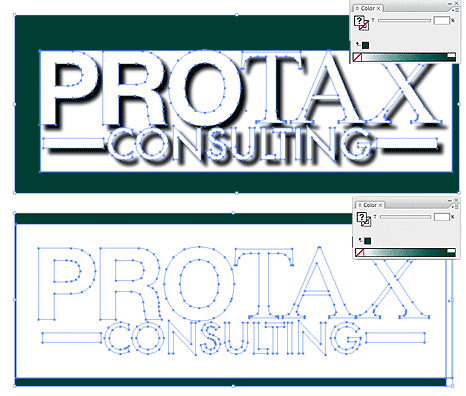
As you can see, when a Pantone color is under these object effects, transparency issues show up during printing. To avoid this, convert all your Pantone colors into CMYK before submitting your order.
The second way Pantone colors can affect your file is when you use transparent images. Here is what a transparent image looks like on screen:
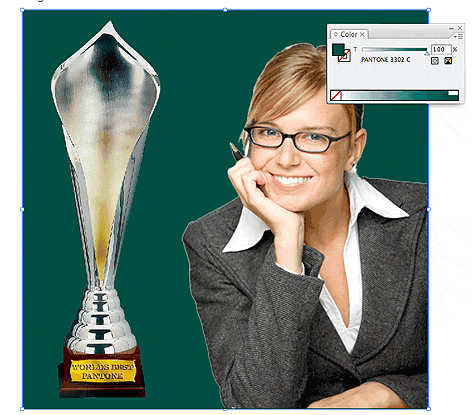
Here is what a transparent image looks like after printing:
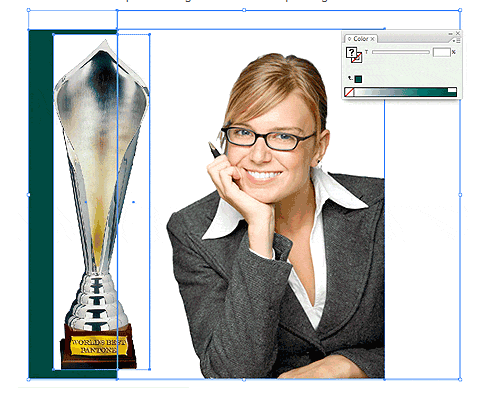
You can see the image is no longer transparent on top of the Pantone color. These white areas will show up during printing. To fix this issue, convert all your Pantone colors into CMYK. This must be done before submitting the order.
The last way Pantone colors can affect your order is the color conversion between a Pantone color and CMYK. If you use Pantone colors in a job that will print CMYK, your job might print with undesirable colors.
Here are some examples of what the Pantone color looks like in the Pantone color book and what the CMYK print will look like:
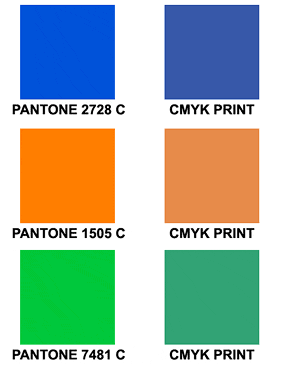
If you send in a job with Pantone colors, the CMYK conversion will change the Pantone color. Before sending your order, make sure all Pantone colors have been converted to CMYK.
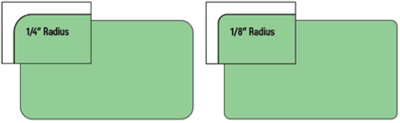
We offer 1/4" and 1/8" radius round corners to all of our customers. The image below shows the two different radiuses for comparison.
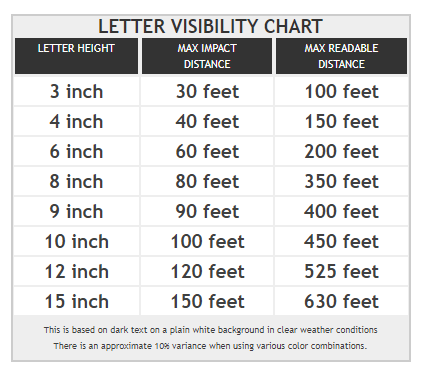
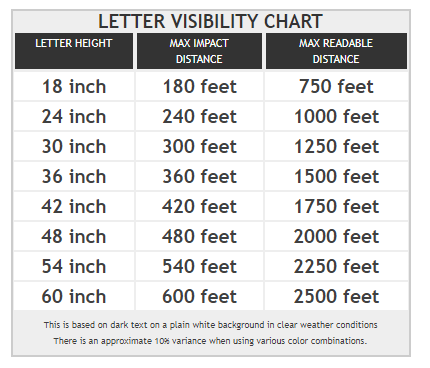
This depends on what the final output size will be, and its viewing distance. Please reference our Scale & Resolution Example Chart and Letter Visibility Chart below:
Some products will have minimum quantities. Other products can be produced in as few as one piece. Please keep in mind, higher quantities will always provide more competitive pricing.
TAS has acquired and is legally allow to purchase, produce and decorate various logos. Please contact us at info@tassigns.com with your logo to confirm it falls into our scope.
Heat transfer involves applying heat to transfer a design onto a surface, while direct-to-film heat transfer uses a film as an intermediary for image transfer, and screen printing utilizes a mesh stencil to apply ink onto the desired material. Each method offers distinct processes and outcomes for various applications.
Please check our ART GUILDLINE > What types of files can I send to TAS?
Yes, you can read more about it in our ART GUILDLINE > What types of files can I send to TAS?
TAS can manipulate images that are vector, editable, and high resolution. Many images downloaded from the web are generally not high resolution, editable or vector. Please send your image to info@tassigns.com to get a confirmation if we are able to resize it.
The most important part of a letterman jacket order is fitting. Currently, we advise everyone to come in to try them on to ensure a good fit. Even though we have sizing available online, letterman jackets are an expensive product. We are working on a new process to be able to translate an order via phone or email…stay tuned!
If you are getting a new letterman jacket, we recommends bringing the person who it will be for so we can have a fitting. Also bring your school letter and any other patches you have received. It is also a good idea to bring pictures or ideas of any jackets, patches or art you’ve seen that you may want to have made.
School letters are awards from you school for certain achievements. These are generally earned and distributed by your school. If you do not have a school letter when you come to order your letterman jacket, we can walk you through the steps to get one or give us the proper information to get approval to make one for you.
We are happy to decorate on your supplied items. In most cases there is never an issue, however, we would need to see the items on a per case basis.